Wednesday, March 30, 2011

How to Make Your Own Yummy (yes Yummy) and Easy (yes Easy) Marshmallow Fondant

Hello dear readers,
Finally - the How to make Fondant, as pictured in this Noah's Ark cake.
More on this cake later :)

In the past, I always would just purchase ready made fondant (usually Wilton's) to use on any of my cakes that required fondant.  I have heard horror stories about making fondant and how hard it was.  I would watch as people would take a piece of cake and peel off this fondant and put nicely on the side of their plate to then throw away later.  I was never upset by this, because to be honest, the pre-made fondants taste like plastic.  I only used it out of fear of making my own.
Then, last July, I entered a contest for my town's birthday and the cake had to made completely from scratch.  So, I searched the recipes on-line and found this recipe on Cake Central.
Before I get to the "How to" of it all, I wanted to share my first experience.  It was VERY funny:
I was such a mess that I couldn't get this gooey mess off my fingers to roll out the cling wrap or open the ziplock bag.
 
I had to wake up my husband to come take my picture because I was laughing so hard.  I didn't know what had happened and why it didn't do what it was supposed to (the next morning, when I made my second batch, I realized that I had put in an extra cup of marshmallow and not added enough powdered sugar).  The good news - it was still salvageable!  I did not have to throw all this away.  After letting it sit over-night, I added more PS and presto - perfect Fondant!  The next day, when I made it with the actual right amounts, it worked PERFECTLY!  It really was so easy and it smelled and tasted great!  (What could taste bad about marshmallows and powdered sugar?)


For the sake of this post, I will edit the recipe a little.  All the wording is hers, and if I have anything in addition to add, it will be in blue.  For the full recipe, go to her post on Cake Central

This MMF (MMF stands for Marshmallow Fondant) is a tad softer than the kind I bought, but I made figures out of it without the addition of gumpaste/tylose/glucose/gumtex or any other thing that is said to help with it. My figures stayed up to the challenge, all I did was kneaded in some extra PS (per figure, I didn’t measure it, just “felt” and adjusted)–Best Part most of it was done in my Kitchenaid!!!

Ingredients

  • 8 Cups of Mini Marshmallows
  • 3 Tbsp of Water
  • 1 Tbsp of Flavor
  • 9 Cups (ish) Powdered Sugar, Sifted
  • 2 Heaping Tbsp of Shortening + whatever you’ll use to grease your work space

Instructions

    Directions (in this order too):
    1. Grease Bowl and Dough Hook of Kitchen Aid
    I find that if I sift the 7 cups that are needed at first, it is easier to add to your mixture, then sift the rest later
    2. Sift 9 Cups of Powdered Sugar in a separate Mixing Bowl (found out this IS VERY important)
    I have used rum, almond and vanilla flavoring
     
    3. Put marshmallows, Water, Flavor, Shortening in microwave safe bowl 
    4. Heat up marshmallow mixture in 30 second zaps, pull out, stir, keep heating until the marshmallows are almost melted, it will look soupy with some lumps 
    5. Scoop 6 Cups of PS in Kitchen Aid. (all the while the marshmallows are sorta cooling down–but don’t let them cool completely) Make a well in the powdered sugar with the measuring cup 
    6. Pour Marshmellow Mixture into PS well, it’s going to spread out and cover all the PS basically, but it helps for it to be in the middle of the PS. 
    7. Put 1 More Cup of PS on top of MM’s 
    8. Kitchenaid first setting, on mine its Stir, once the PS is mostly incorporated, put on the next setting (I used 2), let it run for a while, you’ll notice there is PS on the sides of the bowl, that’s fine, leave it there, try and refrain from scraping it down :) 
    9. Here’s where it comes to your EYE and Finger, You’ll notice it will start to creep up on the dough hook, if its not doing this yet, start adding the PS 1/2 cup at a time until it does (I didn’t let it fully creep up, once it started is when I moved to the next step). 
    10. Touch the mixture, if its goo and sticking to your finger completely, add 1/4 of PS, if its slightly sticky, then you’re ready for the next part 
    11. Prepare a portion of your counter (or where ever you hand knead MMF), Bring your sifted PS left over in your separate bowl where you can get to it easily, Shortening on the area where you’ll knead, dump out Mixture (Just for a visual, I still had to scrape mine out–I tried not to fully mix this in the mixer–I found I got a better workable material if I had some hand kneading in there so I could feel the right consistency). Grease your hands up 
    12. Add more PS like 1/8 of a cup at a time if it appears to be falling under its own weigh–the perfect MMF should be able to hold its weight a little even at this stage– hand knead, add more PS if you need to, (by the time It was all said and done I had left over PS in the bowl-quite a bit, I’d say I only used about 3/4 of the bag in the mixer, and then like another 1/2 cup (maybe) when I had kneaded it.) 
    13. Grease it up, wrap in saran wrap–I used to do the gallon bag also, but I only did saran wrap this time like triple wrapped, but if I were making it a couple days in advance I probaby would of done a gallon bag also–let rest overnight (or at least several hours, 8+).
     Well, that's it!  The best part is that it saves for a really long time.  
    Enjoy the recipe and talk to you soon,  
    Meagan

      Saturday, March 26, 2011

      Book Review - Stardust by Neil Gaiman

      StardustStardust by Neil Gaiman

      My rating: 4 of 5 stars


      After finishing "Neverwhere", I decided to read some of Neil Gaiman's other titles. 

      I have watched the movie starring Michelle Pfieffer, Claire Danes, Robert De Niro, and Charlie Cox and really enjoyed it.  I usually prefer to read the book that a movie is based on first.  I like to imagine my own characters first and then watch a movie.  This time, these characters were already set in my head.  In De Niro's case, he really made the role of the airship's captain.  It was hard to wrap my head around the book's captain, which was barely mentioned and nothing like the movie's character.  There were many things that they changed from the book, some of which, seemed like needless changes. 

      I wished that the book were a little longer.  Time seemed to fast forward in the book.  Journeys of weeks and months took place in a single chapter.  It would of been nice to hear more about the Star's home and life.

      I really like Neil's style.  He really does draw you in.  All that being said, I liked both of them.


      View all my reviews

      I finished 2 books in quick succession, so I posted them both together.  Next up is another Neil Gaiman title, "American Gods", which I am finding a little more slow going.  Also, on my 'to be read' pile is Jane Austen's "Sense and Sensibility".
      To be honest, I have been spending my days planning my son's first birthday.  I am sure that I will have some great tips for you afterwards.

      Talk to you soon,
      Meagan

      Book Review - Crashed by Robin Wasserman

      Crashed (Skinned, #2)Crashed by Robin Wasserman

      My rating: 3 of 5 stars


      I read the original book in this series over a year ago and saw that this author had continued the series.  It reminds me of one of my favorite spec. fiction authors, Nancy Kress, and her "Beggars" series.  Those were excellent books about the future.
      This series was okay, neither bad nor great.  It has an interesting take what would happened had we figured out how to transfer our minds into a mechanical body and therefore live on forever.  It is not such a bright future in Robin's world.  Even the families that tried to save the lives of their loved ones, find that this new "person" is almost alien to them. 
      In this book, the "skinners" and "orgs" (both the negative names that each group gave the other), go head to head.  A religious decides to take matters into it's own hands to get rid of what they think as an abomination.  The author tries to put forth the question, "What makes us human?"  Can it be transferred, does it reside in our thoughts, in our body, etc.  Where is our soul?
      The think that the book would have been a little more interesting to me if I liked the antagonist a little better, but I have always enjoyed books that make you think.


      View all my reviews

      Tuesday, March 15, 2011

      Project 365 Week 9, 10 & 11 Completed

      Hello,
      Boy, this week has been crazy!  I have gone from sick children to full activities all in one week.  I made a cake, went to 2 parties, watched the final mission of the space shuttle Discovery, witnessed the massive earthquake and tsunami in Japan, booked our Disneyland trip, went to the dentist for my kiddos, participated in a huge kids consignment sale and more.  Plus, I managed to get in my scrapbooking for the week.  I have a lot to post over this next week.  Tons of fun stuff, but to start I will share my week 9 of my Project 365.  I made this to match week 8 that I posted last week.
      paper is from Scraps N Pieces, called Romance Valentine's Mini Kit
       Also, I finished my weeks 10 & 11 also.
      Both of these pages are pre-designed pages from Creative Memories called Cottage Garden
      That's it for now, but I am working on finishing my how to make marshmallow fondant and pictures of the Noah's Ark cake that I made, as well as a book review for the book that I just finished.
      Have a fabulous week,
      Meagan

      Sunday, March 6, 2011

      Project 365 - Week 7 & 8 Completed

      I am still going strong on my Project 365.  Now, I have completed 2 full months and I thought that I would give you what I have learned so far.
      1 - It is okay to not have EVERY DAY accounted for.  I think if you stress about each day, the project would not be enjoyable for you.  I have skipped a few here and there, but I have taken a picture 98-99% of the time.
      2 - Make sure to take pictures of things that are important to you as well as what has happened that day.  There are some days that you aren't really doing anything.  These are the perfect days to snap a picture of your favorite items.  This is a great way to really capture what your life was like this year.
      I really like the fact that I am scrapbooking every week and that by the end of this, I will have an up-to-date completed yearly album (which I have been lagging on - I am still working on '03 the traditional style).

      For week 7, I did something different.  I did a 2 page spread.:

      Here is my week 8. 
      I am so happy to have this much done, it makes me feel like I am getting stuff accomplished.

      Thanks,
      Meagan

      Saturday, March 5, 2011

      How to Make Cool Super Mario Brothers Cupcakes

      To celebrate my 8 year old's birthday in class, I made cupcakes.  Since she is very girly, I made Hello Kitty Cupcakes, but I realized that there were quite a few boys in the class that may want something a little less girly.  I found this cute idea on the Cake Central website where someone made Hello Kitty Cupcakes and Super Mario Brothers ones for the same party.
      I picked 2 of the elements from the game that are very easy - the power-ups (mushrooms) and stars.


      Start by baking your cupcakes in preferred flavor (I chose white cake and chocolate cake).  I also used basic canned white frosting and then tinted it to color.  I made 1 batch of white, 1 light green, 1 orange, 1 plain white, and then I also had made chocolate frosting.  You would not need to go this far.  You could keep it basic and just chose 1 color.  Also, you will need a small batch of white fondant. 
      To make the mushroom (aka Power-Up) stalk: 

      First roll out the white fondant to be about 1/4" thick.  Start by cutting a strip of white fondant about 1" thick.  I used my Fondant Ribbon Cutter.  


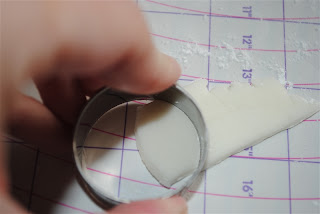
      Then, take your circle cutter and cut out the top half of your circle (you could cut all the way through, but then you would waste some of your fondant that way).


      Next, using the same circle, cut the bottom of the mushroom off.  
      Now, you should have a shape with straight sides, but rounded bottom and top.
      Once you have then cut out, put them aside under a glass to keep them from drying out.


      While you have the white rolled out, go ahead and cut out your white spots for the mushroom.  I looked through my stuff to find a circle cutter small enough, but ended up using my icing circle tip.
      You need 3 spots for each mushroom that you are making.  
      Put these with your stalks to keep from drying.
      Now, you will need to color a small amount of the fondant red and roll out to the same thickness as your white stalks.
      Cut out a circle from the red fondant and place on your thin fondant foam and using your fondant smoother, lightly pull along ("pet") top to either side, so that the fondant becomes an oval.  You could also use your finger if you are careful.

      I also then squished the top and bottom in with my fingers.
      To put it all together - start by cutting a small portion off of the bottom of your red mushroom cap with your same circle cutter (this will mimic the top of the stalk).
      Now, place your stalk against the bottom of your cap and using a small amount of water or clear vanilla extract, meld the 2 pieces together.  Use a tool to blend them and bind them a little better.
      Use your smoothing tool to make your "spots" flatter and wider.  Attach 3 spots across the cap of your mushroom using water/vanilla and press in with the smoother.
      To add the eyes, color a very small amount of fondant black.  Roll a tiny ball of black fondant into a ball.  Lengthen into an oval.  Place eyes onto stalk and press flat.  Use water/vanilla and press further if needed to attach.
      And you are done!

      I also cut out stars from yellow fondant and added black eyes.  Place the mushroom or stars on top of the iced cupcakes to complete the look.
      It's really easy.
      I hope you like them and they are the hit of your Mario party!
      Meagan

      Friday, March 4, 2011

      Book Review - Blue Moon by Alyson Noel

      Blue Moon (The Immortals, #2)Blue Moon by Alyson Noel

      My rating: 2 of 5 stars


      I had read the first book in this series awhile back and it had been at least mildly entertaining, so I picked up book 2 of the Immortals series. 

      This book, I found whiny.  The whole first half of the book she (the main character) whined about the fact that her boyfriend had been alive 600 years before her and therefor had had previous "partners".  It was a little much. 

      Even when the book got better, she still whined about it.  I think I may pass on the next books in the series even though I had already purchased book 3.  


      View all my reviews

      Book Review - Neverwhere by Neil Gaiman

      NeverwhereNeverwhere by Neil Gaiman

      My rating: 4 of 5 stars


      I have always wanted to read Neil Gaiman and just never ended up doing before now.  I picked up Neverwhere and delved into his world.  I was captured right from the start.  I found it cool how he merged everyday London streets with a world that lives beneath us.  He made it very believable that there is this world that exists and we just pretend that we don't see it - that someone could "fall through the cracks" of our world and also cease to be a member of the regular world.

      The characters were very interesting.  Even his bad guys were very compelling.

      I guess the biggest compliment that I could give it was that when I got to the end (which I liked), I wished that it would continue and that there was another book to follow with new adventures.


      View all my reviews

      I had someone suggest Neil to me ages ago and then I found pictures of his library and I fell in love (with his library :) )!  It is so amazing to make a bibliophile completely jealous!!
      Here is a sneak peak:
      Click here to see the rest of the pictures and info about this cool place to sit and read!