Wednesday, October 9, 2013

Fall (ing) in Love

Can I just say how much I love fall.  I love all the things about.

  • The weather cools off (but isn't cold).
  • The leaves are all just gorgeous and makes me want to grab my camera and head outside.
  • Pumpkin EVERYTHING!  Yes, I see recipes and mixes, and cakes, and coffees, and creamers, and cupcakes, and breads, and donuts, and, and, and, and - I just can't get enough Pumpkin!  (see below for my new fav recipe)
  • I love to visit Pumpkin Patches!  All the hay rides, farm animals, and picking pumpkins!
  • Giant Pumpkin Festival - our area hosts a great festival celebrating this fun time, with awards for largest pumpkin (this year the prize went to a 1874.5 lb monster of a pumpkin.  Plus, they even have a pumpkin regatta, fun booths, events and more.
  • Halloween - I just love to dress up and my kids are no different.  
  • Halloween & Fall Shows - My DVR is going crazy trying to record all the fun shows.  One of mine and my kids favs is Halloween Wars, where they have to create a scene with pumpkin, cake and sugar art.  It is amazing what they create.
So, fun!  

Here is my recipe for Pumpkin Spice Cupcakes 
via Cake Central

INGREDIENTS:
1 box spice cake mix 
1 cup all-purpose flour 
1 cup granulated sugar 
1 tsp salt 
3 eggs 
1 cup water 
1 cup sour cream 
1 cup canned pumpkin 
2 tsp vanilla extract 

DIRECTIONS: 
Whisk together dry ingredients, then add wet and beat on low speed for 2 minutes. Bake at 325 for 20-25 minutes. Makes about 36 cupcakes. 

**Decorator's Cream Cheese Frosting
INGREDIENTS:
1/2 cup of shortening 
1/2 cup (one stick) unsalted butter @ room temp 
1 8oz bar cream cheese @ room temp
1 tbsp clear vanilla extract
2 lbs sifted powder sugar
1/2 tsp salt
1 tbsp cinnamon 

DIRECTIONS: 
Cream together shortening, butter, and cream cheese until nice and smooth. Add vanilla into mixture and combine. Sift together sugar, salt and cinnamon, and slowly add to shortening, butter & cheese mixture. Make sure that all sugar is incorporated. Enjoy!
*If too stiff of a consistency use less sugar but all the salt or gradually add milk to make the perfect consistency!

What do you love about Fall?  Do you have any great recipes to share?  Let me know.
Have fun and enjoy all the fall greatness!
Meagan

Friday, August 23, 2013

Disney Car's Birthday Party


Hello All!
This morning, there was a challenge to do a scrapbook layout about celebrations and I immediately thought about the fun party that I threw for my 3 year old.  He was in love with Disney Cars (and so were we!).  I worked to transform my house into Cars Land! I scoured the internet for inspiration. Check out my Pinterest Board for more: http://pinterest.com/meagan43/disney-cars-party/
To start - you need a starting line!  I made my own with fabric in red and black/white racing checked.  I cut out the letters of black felt and sewed them onto a rectangle of more of the black and white checked.

Then, I designated areas like in Cars Land.  You fuel up at Flo's (lunch), you get surplus at Sarge's (presents), you stop in at the Cozy Cone for treats (desserts), and play at Luigi's & Mater's.  I think everything came together!  Without further ado, here is the photos
We enlarged (a lot) a photo that we took of the real Flo's sign in Disneyland's Cars Land, backed with foam core and cut it out.  It still hangs in my kitchen 4 months later ;)

Easy decor - found the image for Dinoco online, added it to a blue background (digitally) and then added to empty cans.  Just a fun little element.  Although, they would also make a good bowling game.
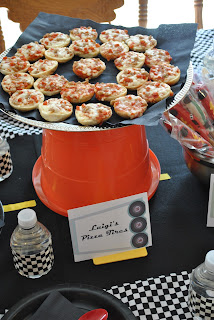
I took great pains, to make all the food "theme" related.  I served: Luigi's Pizza Tires, Mack's Cheesy Wheels, Lizzie's Nuts & Bolts (snack mix - I had to search to find one that seemed most like nuts and bolts), Ramone's Fruit Cars (apples & grapes - easy & fun), and Lightning McQueen & Francesco Bernoiulli's Chocolate Dipsticks (I took the basic Wilton race car pretzel rod candy and added eyes and the right coloring to look like the iconic cars characters).  Another fun thing that we did was to make a road table cloth.  I enlisted the help of my mom who sews faster and better than I to sew a black felt strip in the center to the black & white check and then to sew yellow ribbon road lines down the middle.  Unfortunately, I don't have a picture of just it.  We made 2 roads, one for the main Flo's Table and then just a road strip for the Cozy Cone table on top of an orange base.  They turned out so great!


BTW - the kit that I used to make the Flo's food labels is a retro kit called retrO from Oscraps.
I loved this idea that I found to have Fillmore's Organic Fuel.  I emptied 2 water jugs and filled one with "Anti-Freeze" (aka lemon-lime Kool-aid) and the other with "Motor Oil" (aka iced tea).  Then I found racing checked duct tape and covered the labels of water bottles.  Fun and easy!
I had plans to make these things more 'fleshed' out.  I was actually going to make specific game areas for Luigi's & Tow Maters.  I absolutely LOVE, LOVE, LOVE how the Mater sign turned out.  It was really easy to cut out a tan foam core board, age it with brown, and then add the white paint outline.  The tires are just black foam.  Luigi's Leaning Tower of Tires was a last minute addition and a HUGE hit to the party itself.  I found these blow-up tires are Dollar Tree and bought 12.  The kids had such a blast just stacking, rolling, jumping on and every other way of playing with blow-up tires.  WAY worth the $12!  I sent each of the kids home with one, too ;)

For the treat table, I had a blast.  My kiddos helped me to transform out Cone drink holders into Cozy Cone hotel rooms.  I found instructions on the Disney site to do it to regular cones and adjusted to what I already had on hand.  They were the perfect decorations to set the mood for this table.  


I saw this cute idea to take terra cotta pots painted orange to serve treats on and just knew that I needed to do it.  This took 3 coats of orange spray paint.  I tried gluing the tiers together, but they did not stay glued. Obviously, I used the wrong adhesive, but I didn't have any problems with the server.  For the cupcakes, I found this scrumptious recipe for Orange Creamsicle Cupcakes and wanted to serve them (keeping the orange cone theme) .  I made the little cones for the top easily with orange marshmallow fondant.

Every time, we are in Disneyland, my husband eats his weight in popcorn and of course, they added a special Cone location for "Popcone", so I wanted to include it.  I found this antique Pepsi crate and wanted to use it to hold my cones.  I made the cones from orange construction paper and filled with popcorn.  I sort of mis-judged the size of the cones and the are a little too wide - oh well.  

I also wanted to include a more traditional flavor, so I made my Bavarian Bliss cupcakes (Bavarian Cream-filled white Cupcake with Buttercream Icing).  I made Route 66 fondant toppers and some Speed Limit 3 paper signs to top them.  I added an extra couple of flags on my white cupcake stand that looks retro, so it fits perfectly for the theme. 

It all looked great.  I had wanted to make the Cozy Cone sign for over it, but ran out of time.

Last, but not least, the favors were pretty simple.  I collected inexpensive cars, stickers, and small logo items.  Included an extra chocolate dipped pretzel rod and they got to take home an inflatable tire.

Finally, I want to share the layout that I did today of all the Flo's details
It is a simple layout using Britt-ish Design's Nothing But Pictures 3 template and her Cars Rule kit

All the kids had a great time and I just loved all the little details, I wanted to leave it all up forever ;)
I hope I have given you some inspiration to pull off your own Cars party!
Meagan

Friday, July 5, 2013

Iron Scrapping & Guest CT experience

Well, it has been a busy last 6 scrapping months!
It seems like everything has been right on top of another thing.  I have gone from 1 site event to another - Mousescrapper's Birthday, OScraps 7th Birthday, Scrap Orchard Scrapper Bowl.  Then, I joined M&M Designs page converting team for templates.  She designs more templates than I would have believed possible.  She started with just me, added another converter immediately and has since added 2 more ladies to share the load.  Almost as soon as I learned that I would be converting, I learned that I won a guest CT (creative team member) spot for OScraps from their birthday challenge.
That was a huge learning experience for me.  I have always wondered what it would be like to be a Creative Team member.  I created 1-2 LOs a week for 2 months using their product.  I received GCs to pick up whatever product I wanted, plus lots of extras of new product. I did a total of 30 layouts!  It was so inspiring to have access to all of those items.  They of course wanted you to use the product you downloaded immediately so that they could use it for advertising.  Being a guest was much easier than being a full team member.  I had more freedom, but I was supposed to comment in the forums and leave "love" on customers LOs.  I am really glad that I had the opportunity, but it was also a lot of pressure.  I felt like I should have been in the forums more than I was.  I will go into the next opportunity with more knowledge.
My favorite LO that I did for OScraps was this one of my Dad.  It is one of those special photos that I haven't scrapped and was almost afraid to.  I just LOVE how it turned out.  It is using Paula Kesselring's Just Me & Dad

Well, I am done with my CT, but I still have a ton of goodies to work with and a couple more gift certificates for their collabs to pick.  All in all, a great experience.
Now, I am on to the next challenge - Scrap Orchard's Iron Scrapper.  This is a month long celebration.  For every challenge that you do, you get points to win some pretty big prizes, including a laptop and TONS of product!
I just did the Week 1 Challenge using their bundle called Into the Forest, the Facebook Hop, Crop IS Battle, Avatar Challenge and made a new siggy (above).  So far, I have 8 points out of 8, but tonight is another event and I don't think that I will make that one.  A huge downside is that you do have to spend money to do many of the challenges.
Well, Wish me LUCK!

Meagan

Monday, May 20, 2013

Luau inspiration

I wanted to stop in and show off a little.  My husband asked me to do the decorations for his boss' retirement party.  It was to be a Luau for a group of mostly men and their wives.  My husband kept telling me that it was a "guy's party" - I think that meant no fufu ;) There was 150 originally expected, although the numbers ended up being around 110.
I searched the web, having an idea of what I wanted and gathered pictures on Pinterest.  I wanted to stay away from plastic lobsters and like.  I was looking to make it look more like being on the islands.
Here is what I came up with.


What do you think?  I got lots of compliments that night.  Even from the servers, who stopped me to say that they looked better than many floral arrangements they had seen there.  I was even asked if I did this for a living.  I guess that is a pretty good compliment!  

Details?  The Birds of Paradise were silk bought on-line for about $3-4/each.  The tropical leaves were found via ebay.  The tabletop Tiki torches were from Oriental Trading ($6.50/2) as were the leis (about $65).  I also bought all fresh fruit - pineapple, coconuts, bananas, mango, papaya, kiwi, lemon and limes.  The fruit ended up being just under $100 (about $7 per table) if you are looking to replicate this in your backyard.  The big flowers were found at JoAnn on sale for about $4 for a huge bunch of 7 hibiscus.  Also, at JoAnn's were extra Birds of Paradise at about $6/each, on sale buy 1, get 1 50% off.  I borrowed the shells from my Aunt Becky since she had done a luau herself.  The total for 15-20 tables was about $350.  Some of the cost was due to buying for the higher original number.  I later saw the torches at a local party store for $2-2.50 each.  It was such a striking table and mostly edible - saw many guests nibbling away!


Tuesday, May 14, 2013

I've been scrappin'

The last month has flown by faster than most!  I could not believe that it was 6 weeks ago that I learned that I would be a guest Creative Team member for OScraps, while still doing my converting for M&M Designs.  I figured that was pretty perfect - I could use the templates for one and the items from the other.  Needless to say, I have been completing a lot of pages!


I am going to keep scrapbooking!

Monday, April 15, 2013

Exciting News

I am so excited!  I hadn't posted anything at first, because it didn't feel real.  I kept waiting for them to say - "oh, whoops, never mind!"  So, what is my news, you ask?  I have become a CT member for one designer and a guest CT for an entire site for May & June!  What does that mean?
In the digital scrapbooking world, designers create digital papers, elements, templates and more for their customers to make beautiful scrapbook pages (which would later be printed and added to their albums).  These designers then need people to create layouts with their product for the designers to use for advertising purposes (sometimes, it is easier to see if you like a kit, when you can see what someone else has done with it.)  These people are part of a Creative Team or CT, to assist the designer.
Well, Mel from M&M Designs is a template designer over at Stuff to Scrap.  She decided that she wanted to start offering her templates in the .page and .sbpage format so that those of us who us who use another scrapbooking program like Creative Memories Storybook Creator will be able to use her templates.  To do that, she needed someone to convert them for her.  She chose myself and another team member.  Since she is opening a new store May 1st and changing the look of her "packaging", it has been a SUPER busy month for Shawna and I to convert everything in time.  I can't wait to share some of the templates that she is releasing next month!
During the beginning of March, I participated in the OScraps 7th Birthday Celebration.  They had a ton of challenges, one of which was to do 7 challenges (1 each day) and the winners of which would win a guest team member site.  I won the 2nd place prize!  I have never won anything so large.  I will get free products for those 2 months to create LOs with and post them.
Both of these things just show that if you put it out there and try, it could have happen to you, too!
So, May will by busy for me!  I will be posting my LOs for sure!
Until then, put yourself out there - you never know!
Meagan

Friday, January 18, 2013

Mousescrappers Speed Scrap Marathon!

I simply LOVE this time of year!
It is the 3rd annual Mousescrappers Speed Scrap Marathon.  For 3 days (starting in 30 minutes), they will have organized speed scraps to help you get pages scrapbooked.  I love it because I can get 16 pages done of my Disney stuff and earn prizes, too!  For each Speed Scrap that you finish in time, you get a participation prize and if you complete 8 of them by the deadline on Monday, you get a half-marathon goodie bag.  If you complete all 16 by Monday - the full goodie bag!  I love this because even if I miss the prize for an individual speed scrap, I can still finish it and get the goodie bag.

I found these tips over at Capturing Magical Memories blog:

Here are my hints for first timers:
  • Find a Quiet Place: You don’t have to give up your weekend and sit in front of the computer (unless you want to of course). But try to schedule a couple of hours each day to go through the Speed Scrap challenges and put some pages onto paper.
  • Be Late for Your First Scrap: Yes, I did just say be late. But the first time I did a Speed Scrap I got so confused. If you wait until a couple of people finish first and upload their pages you can see how the directions were used. It’s sort of cheating but makes it a lot less stressful.
  • Don’t Get Stressed: Just because the name is Speed Scrap does not mean you are being measured by how fast you go. Most challenges have a minimum window of 4 hours to get it done. Many of the hosts are much more generous so always go ahead and post your page for the world to see. (if you are a traditional scrapper just take a quick photo of the page – nothing fancy)
  • Have Fun: Just go with the flow. Join the chat room and meet some new friends.


So, head on over and get you scrap on!

You will find me there ;)

Meagan